iOS Audio and MIDI in Ableton Live
If you have an iOS device, you’re probably aware of the explosion in apps that have turned iPhones and iPads into formidable members of the studio. But their main blocker to fully integrating into our everyday music-making workflow has always been an issue of connectivity - we feel stuck with the single headphone out (if you're lucky!) and the workarounds have been inelegant at best, dastardly unreliable at worst. With iOS 11 and the advent of IDAM, however, getting audio and MIDI in and out of your device has never been easier. As Discchord put it, iOS11's “Inter-Device Audio & MIDI Solves Everything”. In this guide, we'll walk you through the very simple setup that gets Live and your mobile device talking.

Setting Up
First off, plug your device into a Mac using a standard lightning cable. This is how IDAM routes audio and MIDI information between your Mac and iOS device.
Setting Up
First off, plug your device into a Mac using a standard lightning cable. This is how IDAM routes audio and MIDI information between your Mac and iOS device.
Setting Up
First off, plug your device into a Mac using a standard lightning cable. This is how IDAM routes audio and MIDI information between your Mac and iOS device.
Now here’s the critical part - open up your Mac's Audio MIDI Setup (I prefer to find it using Spotlight) and press [cmd + 2] to pull open "Audio Devices". Find your iOS device among the audio interfaces listed here and click the “enable” button beside its name.
Now here’s the critical part - open up your Mac's Audio MIDI Setup (I prefer to find it using Spotlight) and press [cmd + 2] to pull open "Audio Devices". Find your iOS device among the audio interfaces listed here and click the “enable” button beside its name.
Now here’s the critical part - open up your Mac's Audio MIDI Setup (I prefer to find it using Spotlight) and press [cmd + 2] to pull open "Audio Devices". Find your iOS device among the audio interfaces listed here and click the “enable” button beside its name.
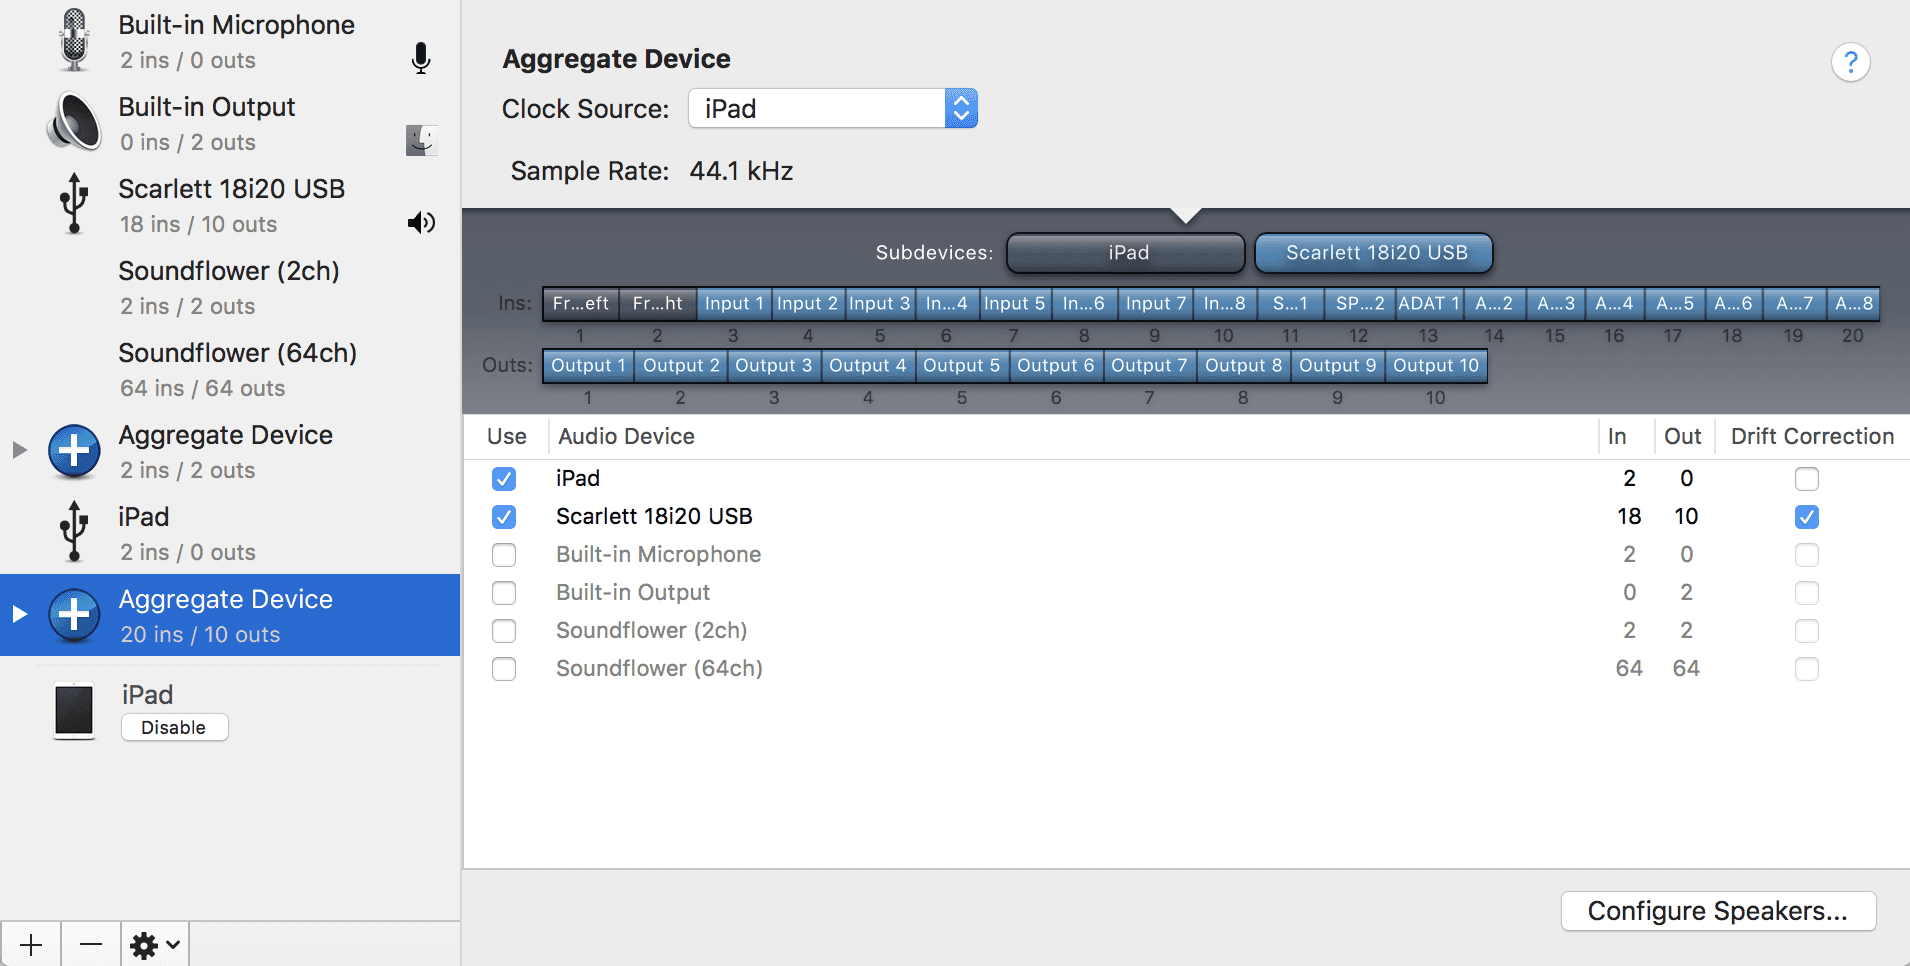
And that’s pretty much it for set up. Keep in mind that the iOS device is now subject to all the options that “normal” audio interfaces are. For example, you can include it in an aggregate device or multi-output device if you require it.

There are multiple benefits to this - the obvious one is that you can continue to use your primary audio interface's inputs and outputs and use iPad’s at the same time, allowing mics and other external gear to continue feeding into Live along with your iPad. Keep in mind this will introduce a little latency, but unless it's absolutely critical you probably won't notice it.
The other, perhaps less obvious benefit is that you can “preserve” your iOS device as an input for Live even when it’s not plugged in. Say you’re recording from your iPad and have it set up as an input in Live. Normally, when you unplug the iPad, Live will no longer be able to find it and your input is set to ”No Device." If iPad is set up as an input of an aggregate device, however, that aggregate device can remain as an input in Live even if the iPad portion is unavailable. When you plug your iPad back in, it repopulates the aggregate device but there’s no need to reselect it in Live!
One hiccup - whether you set up an aggregate device or not, you will still need to “enable” the iOS device as an audio device each time you plug into your Mac.
And that’s pretty much it for set up. Keep in mind that the iOS device is now subject to all the options that “normal” audio interfaces are. For example, you can include it in an aggregate device or multi-output device if you require it.

There are multiple benefits to this - the obvious one is that you can continue to use your primary audio interface's inputs and outputs and use iPad’s at the same time, allowing mics and other external gear to continue feeding into Live along with your iPad. Keep in mind this will introduce a little latency, but unless it's absolutely critical you probably won't notice it.
The other, perhaps less obvious benefit is that you can “preserve” your iOS device as an input for Live even when it’s not plugged in. Say you’re recording from your iPad and have it set up as an input in Live. Normally, when you unplug the iPad, Live will no longer be able to find it and your input is set to ”No Device." If iPad is set up as an input of an aggregate device, however, that aggregate device can remain as an input in Live even if the iPad portion is unavailable. When you plug your iPad back in, it repopulates the aggregate device but there’s no need to reselect it in Live!
One hiccup - whether you set up an aggregate device or not, you will still need to “enable” the iOS device as an audio device each time you plug into your Mac.
And that’s pretty much it for set up. Keep in mind that the iOS device is now subject to all the options that “normal” audio interfaces are. For example, you can include it in an aggregate device or multi-output device if you require it.

There are multiple benefits to this - the obvious one is that you can continue to use your primary audio interface's inputs and outputs and use iPad’s at the same time, allowing mics and other external gear to continue feeding into Live along with your iPad. Keep in mind this will introduce a little latency, but unless it's absolutely critical you probably won't notice it.
The other, perhaps less obvious benefit is that you can “preserve” your iOS device as an input for Live even when it’s not plugged in. Say you’re recording from your iPad and have it set up as an input in Live. Normally, when you unplug the iPad, Live will no longer be able to find it and your input is set to ”No Device." If iPad is set up as an input of an aggregate device, however, that aggregate device can remain as an input in Live even if the iPad portion is unavailable. When you plug your iPad back in, it repopulates the aggregate device but there’s no need to reselect it in Live!
One hiccup - whether you set up an aggregate device or not, you will still need to “enable” the iOS device as an audio device each time you plug into your Mac.
Recording Audio
I personally would find a lot of inspiration in sampling spoken word from podcasts, but I was always fairly de-motivated to record when I heard an inspiring soundbite; having to set up unwieldy, dongle-y cables and external devices (or even being near enough to them) didn't offer the speedy capture I wanted when the iron was hot. With IDAM, I can grab recordings immediately and without much fuss wherever I am.
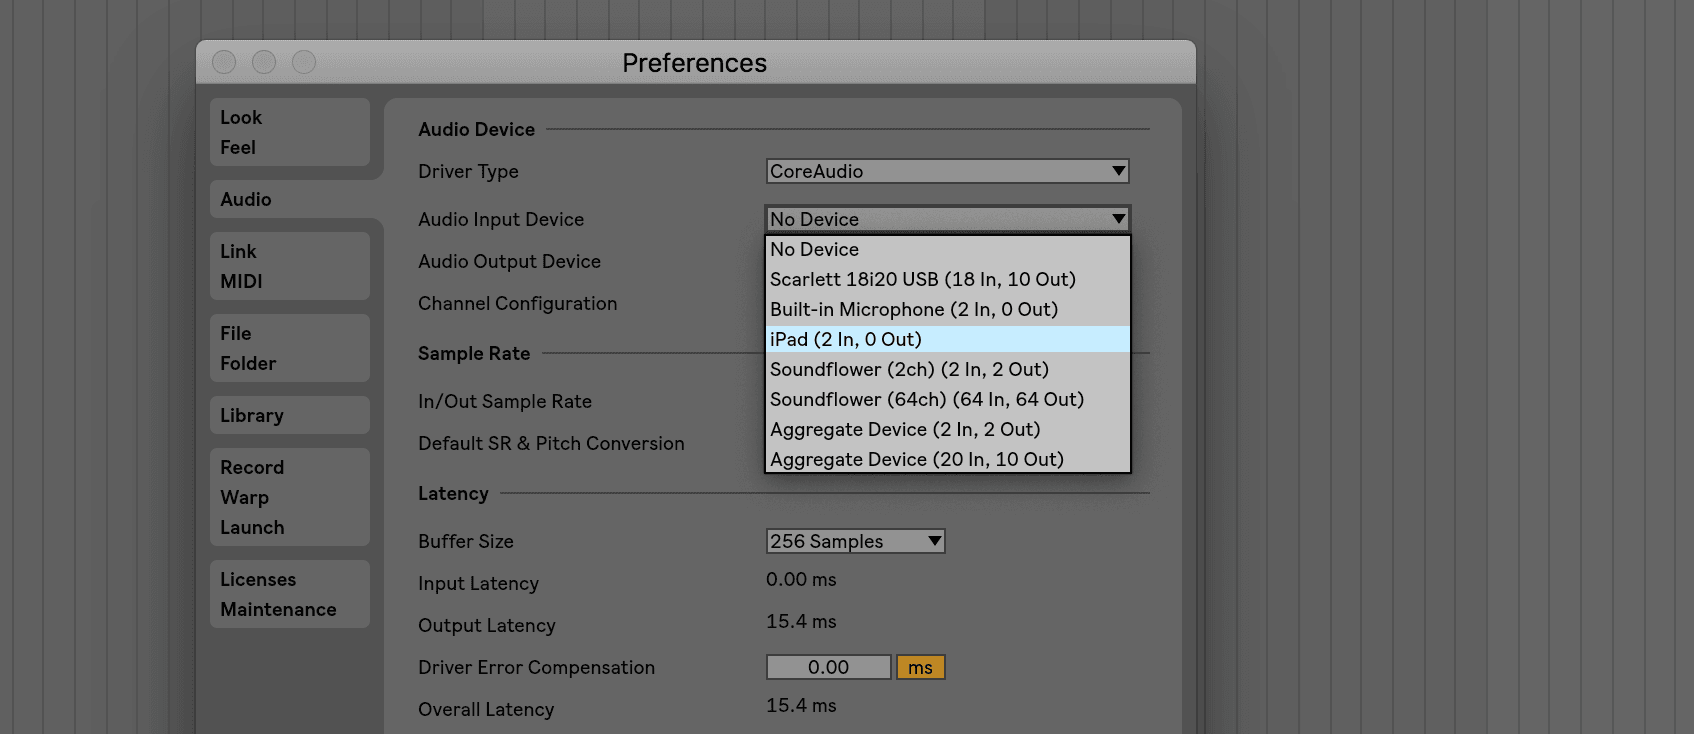
In Live, you just need to open up settings and select your iOS device as your audio device as you would any other interface. It’s seriously as simple as that.

With your iPhone or iPad set up as an input audio device, you can route its output to an audio track by selecting Ext. In as the input. With that, any output from the iOS device will be routed as digital audio directly through to Live.
In these situations, don’t forget that Link can also be an extremely handy tool to use. Link is a simple and reliable protocol for syncing tempo-related information between devices, including computers running Live. Using Link will make sure your recording is in time with your project and can save a lot of editing headaches during this process. Most apps have Link support these days, but refer to this list for a complete list of supported software.
MIDI In, MIDI Out
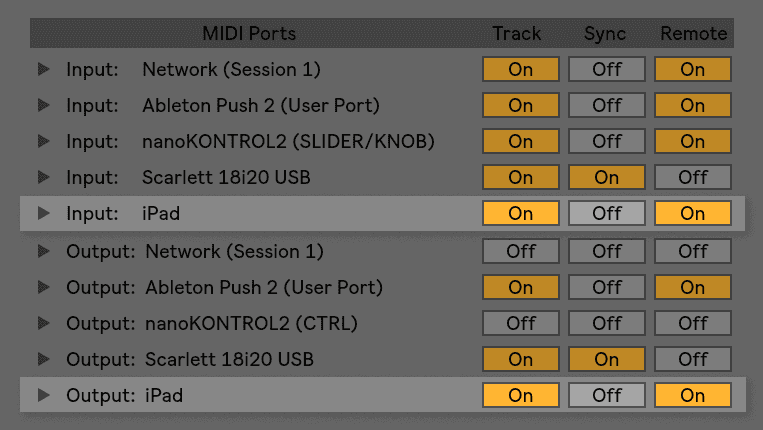
I think capturing audio is the best use for IDAM, but if you use a lot of music apps and want them to feel like fully integrated VSTs in your project, you’ll want MIDI interconnectivity too. As long as it’s enabled in Audio MIDI Setup, your device will be available as a MIDI device in Live. Just make sure that Track and Remote are engaged in settings to ensure Live picks up the notes and control changes, respectively.

If properly set up, you should be able to play instruments in your apps with MIDI sent from Live. This means your keyboard controllers and clips can play any iOS synth via Live. Combined with the audio side of IDAM, you’ll be able to treat music apps like VST's with their own dedicated screen.
If properly set up, you should be able to play instruments in your apps with MIDI sent from Live. This means your keyboard controllers and clips can play any iOS synth via Live. Combined with the audio side of IDAM, you’ll be able to treat music apps like VST's with their own dedicated screen.
If properly set up, you should be able to play instruments in your apps with MIDI sent from Live. This means your keyboard controllers and clips can play any iOS synth via Live. Combined with the audio side of IDAM, you’ll be able to treat music apps like VST's with their own dedicated screen.
There are loads of apps that take some really inspiring approaches to generating and controlling MIDI, such as Fugue Machine and the wonderful new suite of AU-enabled sequencers from Bram Bros. If Live is set up to receive MIDI notes from your apps, you can record out and harness this MIDI to control any plugin in your library.
If you're new to iOS audio apps, don't feel you need to take advantage of all these features at once. Find one or two apps that inspire you and one or two simple ways to use it within your existing workflows and let it grow organically from there.
Conclusion
So that’s IDAM - the simplest way to get sounds and notes between your apps and Live. For me, this opened up an entire new genre of instruments, controllers, and sounds that used to be a hassle to link up. Sometimes the best music gear for the job is what's already in your pocket.
Conclusion
So that’s IDAM - the simplest way to get sounds and notes between your apps and Live. For me, this opened up an entire new genre of instruments, controllers, and sounds that used to be a hassle to link up. Sometimes the best music gear for the job is what's already in your pocket.
Conclusion
So that’s IDAM - the simplest way to get sounds and notes between your apps and Live. For me, this opened up an entire new genre of instruments, controllers, and sounds that used to be a hassle to link up. Sometimes the best music gear for the job is what's already in your pocket.
pATCHES © 2024
pATCHES © 2024


